Garlic is one of the most versatile and widely used ingredients in kitchens around the world. From adding flavor to dishes to providing numerous health benefits, garlic is a must-have in any household. But what if you could grow your own garlic at home using just a few plastic bottles?
This innovative method is eco-friendly, space-saving, and perfect for urban gardens. Even if you have limited space on your balcony, terrace, or windowsill, you can cultivate fresh, aromatic garlic with minimal effort. In this article, we’ll guide you step by step on how to grow garlic using plastic bottles, from preparing cloves to harvesting your own crop.
🌱 Why Grow Garlic in Plastic Bottles?
There are several advantages to growing garlic in plastic bottles:
- Space-Saving: Ideal for small balconies, patios, and urban apartments.
- Recycling-Friendly: Repurpose old bottles, reducing waste.
- Easy to Manage: Bottles help contain soil and moisture, making care simple.
- Pest Protection: Growing in containers reduces exposure to pests and diseases.
- Portable: You can move bottles to get more sunlight or shelter from harsh weather.
This method allows anyone, even beginners, to enjoy fresh, homegrown garlic without a garden bed.
🧄 Choosing the Right Garlic

Before planting, it’s important to select the right type of garlic. There are two main types:
- Softneck Garlic:
- Produces more cloves per bulb.
- Stores longer than hardneck varieties.
- Suitable for warmer climates.
- Hardneck Garlic:
- Produces fewer but larger cloves.
- Forms a flower stalk called a scape.
- Better for cooler climates.
Choose garlic suited to your region and taste preferences. Organic, healthy bulbs are ideal for planting, as store-bought supermarket garlic may sometimes be treated with chemicals that reduce sprouting.
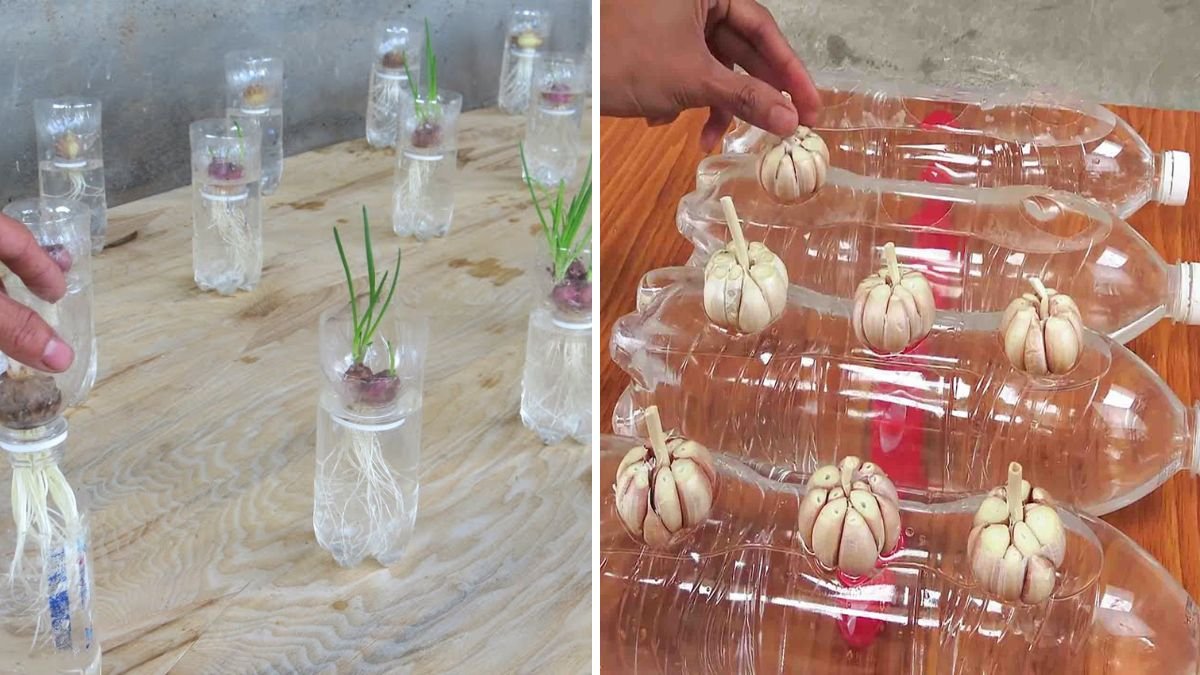
🛍 Preparing Plastic Bottles for Garlic Planting
You’ll need plastic bottles of 1–2 liters. Follow these steps:
- Clean the Bottle: Wash thoroughly to remove dirt or residue.
- Cut the Bottle: Cut horizontally about one-third from the top or make a vertical slit to access the soil easily.
- Create Drainage: Poke 3–5 holes at the bottom for water drainage.
- Optional: Cover the bottle with black tape or paint to reduce light exposure to roots and soil.
Bottles can be placed horizontally or vertically, depending on your space and preference.
🌿 Preparing Garlic Cloves for Planting
- Separate the Bulb: Break the garlic bulb into individual cloves, keeping the papery skin intact.
- Select Healthy Cloves: Avoid damaged or small cloves, as they may not sprout.
- Optional Pre-Sprouting: Place cloves in a cool, dry, and well-lit place for 1–2 weeks to encourage early sprouting.
Planting larger, healthy cloves gives stronger growth and bigger bulbs.
🥄 Filling Bottles with Soil
Garlic grows best in well-drained, nutrient-rich soil. Here’s how to prepare your bottles:
- Use a mix of garden soil, compost, and sand for good drainage.
- Fill the bottle about 2/3 full.
- Leave space for watering and room for the garlic to grow.
Avoid compacted soil, as garlic requires loose soil for bulb expansion.
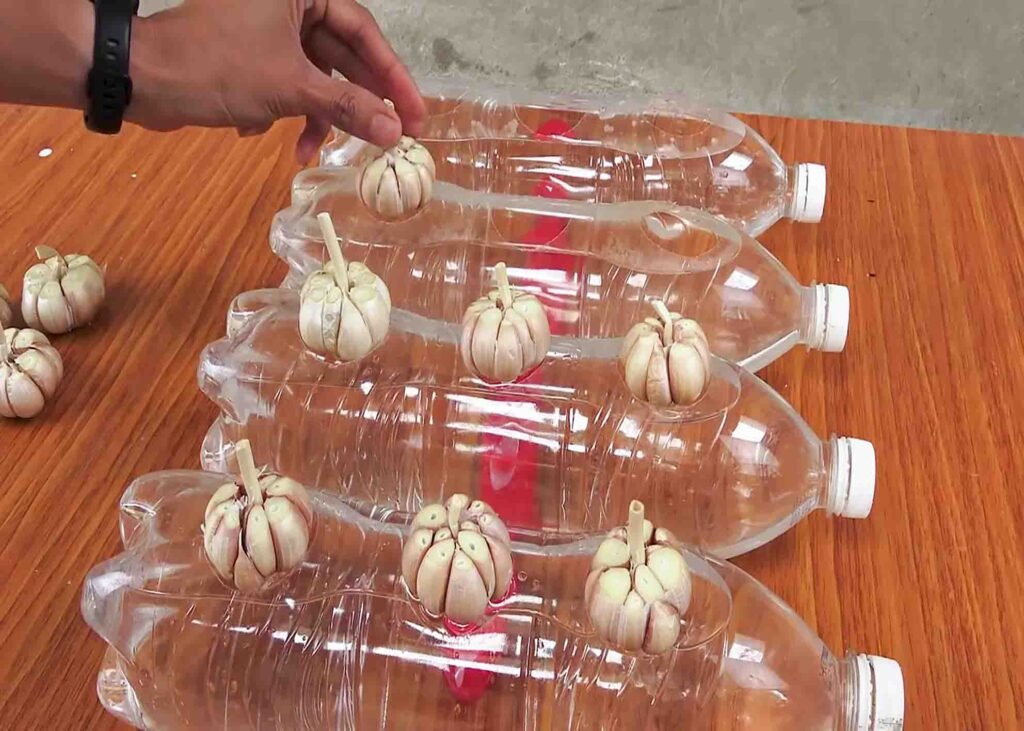
🧄 Planting Garlic in Bottles
- Place Cloves: Plant each garlic clove with the pointed end facing upward and roots downward.
- Spacing: Keep 2–3 inches between cloves if multiple are in one bottle.
- Cover with Soil: Add a 1–2 inch layer of soil over the cloves.
- Water Lightly: Ensure the soil is moist but not waterlogged.
Vertical bottles allow you to plant 1–2 cloves per bottle, while horizontal setups can accommodate 3–4 cloves.
🌞 Sunlight and Placement

Garlic needs 6–8 hours of sunlight per day:
- Place bottles on balconies, terraces, or near windows for maximum light.
- Rotate bottles occasionally to ensure even growth if sunlight comes from one direction.
- In areas with limited sunlight, supplement with LED grow lights.
Sunlight ensures healthy leaves and robust bulbs.
💧 Watering Garlic in Bottles
- Keep soil consistently moist but not soggy.
- Water every 2–3 days or when the topsoil feels dry.
- Avoid overwatering, which can cause root rot or fungal diseases.
Adding mulch or dried leaves on top of the soil can help retain moisture.
🌱 Fertilizing for Maximum Growth
Garlic benefits from nutrient-rich soil:
- At Planting: Mix compost or organic manure into the soil.
- During Growth: Use a nitrogen-rich fertilizer for healthy leaf development.
- Before Bulb Formation: Switch to phosphorus and potassium-rich fertilizers to strengthen bulbs.
Balanced nutrition ensures strong cloves and bigger harvests.
🧄 Caring for Garlic in Bottles

- Weeding: Remove small weeds carefully to avoid disturbing roots.
- Pest Control: Watch for aphids or fungal infections; organic sprays like neem oil work well.
- Mulching: Helps retain soil moisture and reduces temperature fluctuations.
- Ventilation: If bottles are covered or in enclosed spaces, ensure air circulation to prevent mold.
Regular attention helps garlic thrive even in small containers.
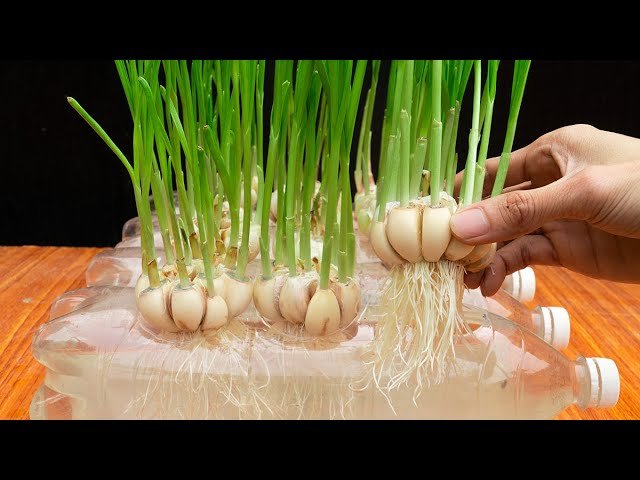
🌸 Flowering and Bulb Formation
- Garlic develops green shoots first, which eventually form bulbs underground.
- Hardneck garlic produces flower stalks (scapes); these can be cut and eaten or left to flower.
- Bulbs form 90–120 days after planting, depending on variety and conditions.
Patience is key; resist the urge to dig up bulbs too early.
🧄 Harvesting Garlic
- Harvest when leaves turn yellow or start drying.
- Remove bulbs carefully from the soil to avoid bruising.
- Cure the garlic in a cool, dry, and well-ventilated area for 2–3 weeks to enhance storage life.
Proper curing ensures long-lasting, flavorful garlic bulbs.
🌎 Reusing Bottles and Sustainable Gardening
- After harvesting, clean and reuse bottles for the next crop.
- You can rotate crops like onions, spinach, or herbs in your bottles.
- This method is eco-friendly, reducing plastic waste while providing fresh produce.
🍽 Using Homegrown Garlic
Fresh, homegrown garlic is more flavorful and aromatic than store-bought. You can use it for:
- Cooking sauces, soups, and stir-fries.
- Making garlic paste or roasted garlic.
- Adding to salads or marinades.
- Preserving as pickled garlic for later use.
Homegrown garlic gives a freshness and taste that elevates any dish.
🌟 Tips for Success When Growing Garlic in Plastic Bottles
- Choose healthy, disease-free cloves for planting.
- Ensure bottles have proper drainage.
- Provide 6–8 hours of sunlight daily.
- Water consistently but avoid waterlogging.
- Fertilize at key growth stages.
- Keep an eye on pests and diseases.
- Cure bulbs properly after harvest for long-term storage.
Following these steps ensures a bountiful, flavorful garlic harvest in limited space.
🧄 Final Thoughts: Growing Garlic with a Few Plastic Bottles
Growing garlic in plastic bottles is easy, affordable, and sustainable. It allows anyone, from urban dwellers to balcony gardeners, to enjoy fresh, homegrown garlic with minimal space and effort.
By selecting the right garlic, preparing your bottles carefully, and giving proper care, you can cultivate healthy bulbs that are flavorful, aromatic, and pesticide-free.
Not only does this method save space, but it also repurposes plastic waste, making your gardening practice eco-friendly. With a little patience and attention, you’ll soon enjoy your very own supply of garlic, ready to enhance any meal you prepare.
Start with a few plastic bottles today, and discover the joy and satisfaction of homegrown garlic!