Plant propagation through cuttings is a rewarding and straightforward process that allows garden enthusiasts to expand their plant collections, share plants with friends, or even start a small business. Cuttings are segments of stems, leaves, or roots that can develop into new plants when provided with the right conditions. One of the most critical aspects of successful propagation is ensuring robust root growth. This article explores various natural techniques to enhance the root growth of your plant cuttings, guiding you to make the most out of your propagation efforts.
Understanding the Basics of Root Growth
Before diving into specific techniques, it’s essential to understand what promotes root growth in plant cuttings. Roots serve several vital functions, including:
- Anchoring the Plant: Roots stabilize the plant in the soil, preventing it from toppling over.
- Nutrient and Water Absorption: Roots absorb water and essential nutrients, ensuring that the plant stays healthy and vibrant.
- Energy Storage: Roots store energy in the form of starch, which can be utilized by the plant when needed.
When propagating cuttings, several factors can influence root development:
- Environmental Conditions: Temperature, humidity, and light play critical roles.
- Health of the Parent Plant: Disease-free and robust parent plants yield healthier cuttings.
- Cutting Technique: The way cuttings are taken and prepared can also affect rooting success.
Natural Techniques to Enhance Root Growth
1. Selecting the Right Cuttings
To maximize your success rate, start with healthy, disease-free cuttings. Choose semi-woody or softwood cuttings from the current season’s growth for most plants. Cuttings should have at least two or three nodes, as these nodes contain the dormant buds from which roots will grow.
2. Timing of Cuttings
The best times to take cuttings are during the plant’s active growth period, generally in spring or early summer. The weather is warmer, and the plant is actively growing, which significantly enhances rooting success.
3. Cutting Preparation
Prepare your cuttings by removing any leaves from the lower part of the stem, leaving a couple of leaves at the top. This helps to minimize moisture loss while encouraging root development. A sharp, clean knife or scissors should be used to make a clean cut at a 45-degree angle to maximize the surface area for root development.
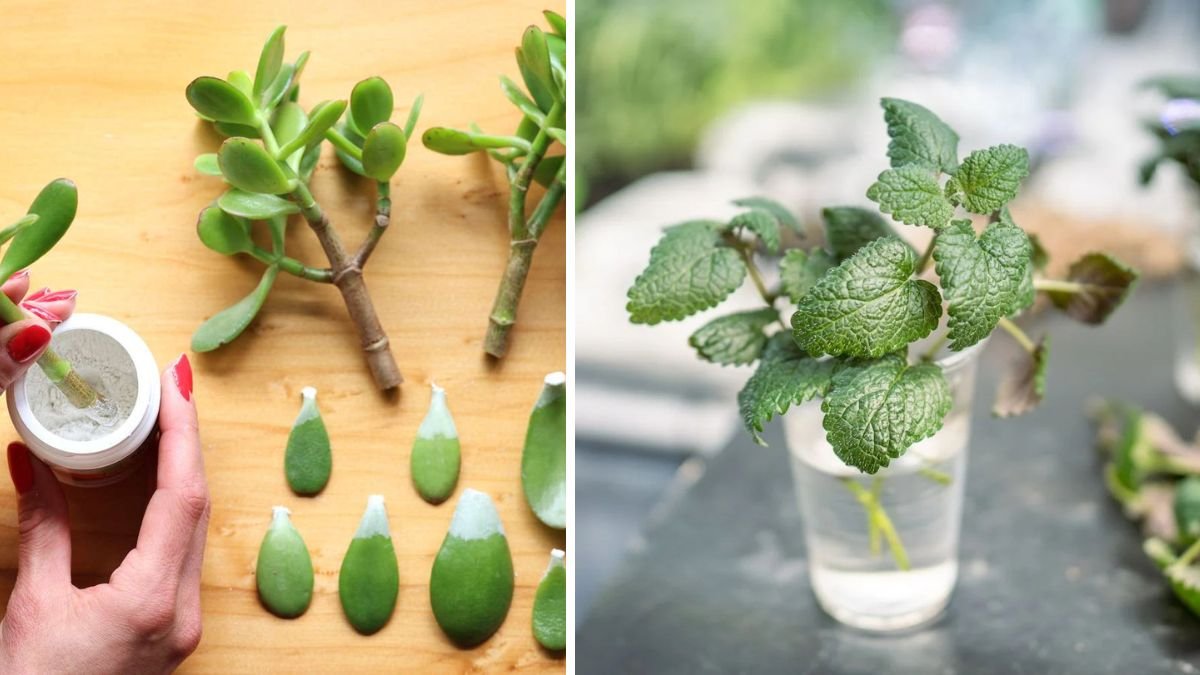
4. Use of Natural Rooting Hormones
Natural rooting hormones can significantly speed up the rooting process. Some effective options include:
-
Honey: Honey possesses antibacterial properties and can act as a rooting stimulant. Dip the cut end of your cutting into honey before planting.
-
Aloe Vera: This succulent holds natural growth hormones beneficial for root development. Extract the gel from an aloe leaf and apply it to the cut end of your cutting.
-
Willow Water: Willow branches contain auxins, natural plant hormones that promote root growth. To create willow water, soak 10-15 small branches in water for 24 hours. Use this water to soak your cuttings for better root development.
5. Keeping Cuttings Moist
Maintaining high humidity around your cuttings is crucial for root development. Use a propagation dome, plastic baggies, or mist the cuttings regularly with water to prevent them from drying out. Be cautious not to create a soggy environment, as excess moisture can lead to rot.
6. Optimal Soil Conditions
The right soil mix can encourage healthy root growth. Use a well-draining potting mix, preferably one formulated for cuttings or seedlings. A mixture of perlite, vermiculite, and peat moss in equal parts works well. Ensure that the cuttings are planted deep enough for stability but not so deep that they are buried.
7. Temperature and Light
Cuttings benefit from warm temperatures and bright, indirect light. A consistent temperature of around 70°F to 75°F (21°C to 24°C) is ideal for root development. Avoid direct sunlight, as it can damage the cuttings. Instead, use fluorescent lights or place the cuttings near a bright window, where they’ll receive ample but indirect light.
8. Be Patient
Rooting can take time, ranging from a few weeks to several months, depending on the species of plant. Check for root growth by gently tugging on the cuttings; if you feel resistance, roots are likely developing.
9. Repotting Cuttings
Once roots have developed, it’s essential to transition the cuttings to larger pots containing a more nutrient-rich soil mix. Be gentle while handling the young plants to minimize shock. Gradually acclimate the new plants to external conditions to prevent any stress.
10. Regular Feeding
After your cuttings have taken root, consider adding a diluted organic fertilizer (like compost tea) to provide essential nutrients. Regular feeding during the growing season can encourage further growth.
Common Mistakes to Avoid
While the techniques mentioned can significantly improve root growth, there are common pitfalls to avoid:
-
Overwatering: This is one of the leading causes of failure in cuttings. Ensure that the growing medium is moist but never soggy.
-
Neglecting Airflow: Humidity is essential, but cuttings also require airflow to prevent mold and rot.
-
Excessive Light Exposure: Direct sunlight can scorch young cuttings; always opt for indirect sunlight.
FAQs
1. How long does it take for cuttings to root?
Rooting time varies by plant species. Generally, softwood cuttings take 2-4 weeks while hardwood cuttings can take several months.
2. Can I use cinnamon as a rooting hormone?
Yes! Cinnamon has antifungal properties and can be used to dust the ends of cuttings before placing them in soil.
3. Is it necessary to use a rooting hormone?
While not necessary, a rooting hormone can significantly enhance the chance of success by speeding up the rooting process.
4. Can I propagate any plant using cuttings?
Most plants can be propagated using cuttings, although some species require specific techniques. Always research the specific needs of the plant you wish to propagate.
5. What should I do if my cuttings rot?
If your cuttings rot, it’s often due to overwatering or poor air circulation. Ensure that your cuttings are in a well-draining mix and placed in a location that allows airflow.
6. How can I tell if my cutting is ready to be transplanted?
When you notice the roots beginning to emerge from the drainage holes at the bottom of the pot, or when they feel firm and anchored in the soil, it’s a good indicator that it’s time to transplant.
Conclusion
Propagating plants from cuttings can be an immensely gratifying hobby, and implementing these natural techniques can help ensure that your cuttings achieve robust root growth. By focusing on the right preparation, environmental conditions, and care, you can enjoy the process of creating new plants and expand your green space with ease. Whether you’re a novice gardener or a seasoned horticulturist, patience and observation are key in witnessing the magic of nature unfold before your eyes. Happy planting!